Crochet Pattern

How to crochet top half double and double crochet patterns
How to crochet
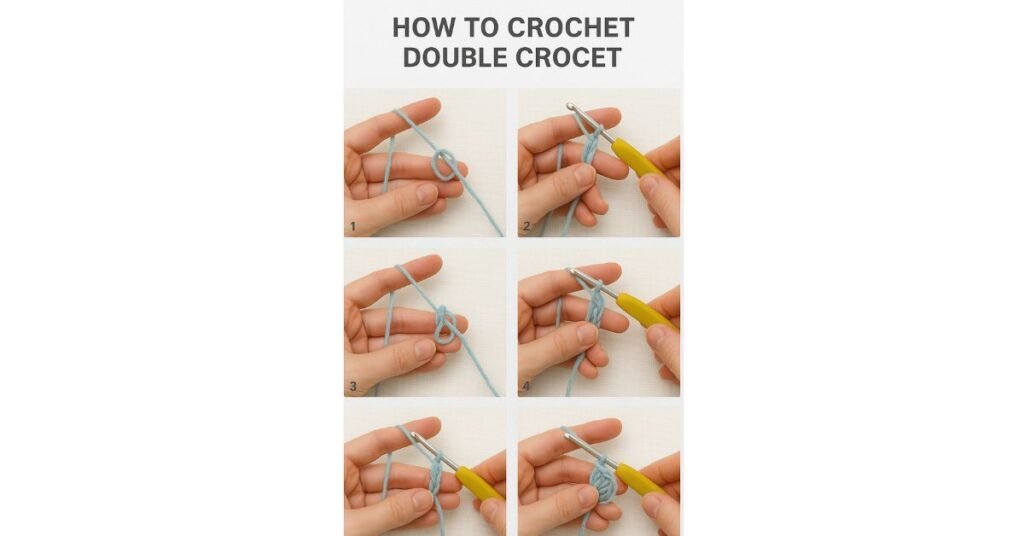
How to crochet double crochet patterns
Wrap the yarn over your hook again, and this time, pull it straight through all three loops on your hook in one smooth motion. Voilà, you’ve just completed one half double crochet stitch!
Learning how to make a double crochet is one of the best steps you can take as a beginner looking to grow in your crochet journey. I remember when I first started holding the yarn just right and looping it over the hook felt awkward. But once I mastered the slip knot and the chain, everything else began to fall into place. Start by chaining 14, but remember to skip the first three chains closest to the hook. That skipped space counts as your first double. From there, you’ll insert the hook into the fourth chain from the hook and begin to pull the yarn through. This will give you a few loops on your hook, a moment that felt magical the first time I got it right. Keep drawing the yarn through in stages, as you form the stitch and move across the row.
Each row gets easier with practice. After you’ve completed the first row of double crochet, your work starts to show its shape. For the next row, you’ll need to bring the yarn to the right height using a turning chain of 3. This made a real difference for me once I realized it’s not just functional, it helps maintain the look of your fabric. The turning part confused me at first, turning the fabric back and continuing across took some practice. But soon I was gliding through, placing the hook under the top two loops of each stitch. One of the things I had to be careful about was ending correctly, not missing that last third chain at the end of each row. It’s easy to skip that step if you’re not paying attention.
At one point, I found myself looking at diagrams like illustrations, just to understand where my hook was supposed to go. Eventually, these references made it easier to continue working confidently. It’s important to know that once you complete each row, it’s good practice to count your stitches; you should have around 12 (including your beginning chain). Knowing the names of parts like the center of the V or the bar in the stitch helps a lot when following more complex patterns later on. Finishing off your piece the right way is just as important. I always cut the yarn cleanly, leaving about a 6-inch tail. Then, I gently pull the yarn through the last loop and close it tightly, no frayed ends or unraveling in sight.
There were moments when terms like correct, placement, or even numbers like 33a, 33b, or 34 looked intimidating in diagrams, but they slowly became a natural part of my crocheting vocabulary. Eventually, I didn’t need to check the illustrations every time. Even now, I occasionally take a break, set my hook down, and come back refreshed, just like I did when I first started and would break from a tricky row. The journey from confusion to clarity with double crochet has been such a rewarding part of my crafting life.
How to crochet Half Double Crochet Stitch or Patterns?
To begin, make a slip knot and start chaining. For this swatch, we’ll make a chain of 20. Once your hook is attached to yarn, just keep attaching loops to form those chains. Keep your hand steady, especially your non dominant one, to hold the stitches in place. Every row begins with careful setup, and this part is key in learning how to keep your stitches even.
After the foundation chain, skip the first two chains and insert your hook into the 3rd chain from the hook. Then yarn over, pull up a loop, and you’ll see three loops on your hook. Yarn over again and pull through all three loops. This completes your first half double crochet stitch, also known as hdc. I remember being amazed the first time I saw the shape form it looked just like the photo in my tutorial book. One step at a time, things began to click.
Now make your next stitch the same way in each of the remaining chains. Use your fingers to hold the chain stitches tight and follow each action carefully. After you’ve worked across the row, you should have about 18 hdc stitches. There was something satisfying about seeing each one line up neatly, just like in the collage of photos I had saved. I used to draw little diagrams and mark each stitch’s position with a number, 1 to 20, to help myself learn faster.
To begin the next row, you’ll need to use a turning chain of 2. That turning chain helps bring the yarn to the correct height, so the next row lines up with the last. Some patterns may count this turning chain as a stitch, and others don’t, so always remember to check the specific instructions you’re following. Working from patterns, especially those with detailed steps, gave me confidence over time.

learn how to make or create a magic ring or magic circle crochet pattern
How to Create or Make a Magic Ring Crochet Pattern

Hold your yarn between your thumb and index finger, and wrap it around your middle finger to create a loop. Cross the loop, then insert your hook under it. Grab the working yarn with your hook, and pull it through the loop. This action creates a little secure ring on your hook. With a turn of the hook, you can begin working your stitches into the ring.
At this point, you should have a small loop held downwards, with the tail and working yarn held between your fingers. It’s important to keep the tension just right, too loose and the ring won’t hold; too tight and you won’t be able to work into it. Begin your single crochets by inserting your hook into the loop and tail, then yarn over, and pull through. After doing this a few times, say, 6 single crochets, which is very common, you’ll have a tight cluster. Before moving to the second round, pull the tail to close the ring tightly, hiding the center hole like magic. If you’re working in continuous rounds, remember not to join with a slip stitch, but simply keep going.
When teaching others, I always recommend doing this process a few more times, until your fingers “remember” the motion. The practice helps your muscle memory, making it easier to use this method in a real project without needing to look up a tutorial again. I’ve reached the point where I can do it without even thinking. It’s such a fun, simple, and effective way to start a piece. And once you’ve mastered it, try using it in one of my free patterns to put the technique into motion. The magic ring is not just a trick, it’s the beginning of creativity